If you’ve already torn through our first batch of smartphone shooting tips and are itching for more ways to wow your prospects and pals with your filmmaking prowess, read on!
#1: How to Shoot Sweet Slo-Mo
Nothing says “epic” quite like a slick slow-motion (slo-mo) shot of an action-packed scene. But it’s important to understand why and when you’d choose to shoot slo-mo over regular speed video in the first place.
Slo-mo is great to use when the action is fleeting and fast paced, and pumping the brakes on gives viewers a fresh, exciting perspective. If you’ve been spellbound by those “super slo-mo” videos of water balloons popping or tank shells firing, you know they give us a window into a world we could never see without the camera’s help. While you might not be firing heavy artillery any time soon, here are some more relatable situations where slo-mo is a good choice:
When to Film in Slo-mo
- Spicing up the Familiar – high-fives, team collaboration on the white board — a little slo-mo can bring new life to the old and familiar. Try experimenting and see what captivates!
- When You’re in For a Bumpy Ride – One nice benefit to slo-mo is it reduces unwanted camera shake and wobble. If you’re filming from a plane, train or automobile, slo-mo wil help smooth out the action considerably. The scene you’re shooting will retain greater detail, too.
- Things You’re Physically Close To – Almost anything can be interesting in slo-mo as long as you’re close to it. A simple close-up of your child blowing bubbles is going to be a lot more epic than a speeding race car shot from a million meters away. Whatever you want to film in slo-mo, get as close as possible to accentuate the grandiosity of the moment.
- Sports – From the crack of a bat to the swish of the net to the splash of diving into the pool, it’s deeply satisfying to see normally fast-paced sports slowed down.
- Animals – Your dog jumping for a frisbee or a hummingbird hovering at your feeder are both times where you’ll see the world in a new way through slo-mo.
When Not To Film in Slo-mo
- When There’s No Movement – For slo-mo to look cool, there has to be, well, some motion to slow down! When there’s barely any movement at normal speed (like landscapes or people sitting and working) you won’t gain anything in slo-mo.
- When the Lighting is Dark – Slo-mo requires much more light than normal video for a clean image. Avoid shooting it after the sun goes down or in dimly lit spaces if you don’t want a soft, grainy picture.
- When Sound is Important – Never film talking-head content in slo-mo — if your footage is slo-mo, so is your sound! While slo-mo audio can lead to some eerie and interesting sounds, you don’t want to rely on it for clean audio.
How to Film Slow-motion
Finally, right? Choose your frame rate on the iPhone in Settings → Camera → Record Slo-mo. Available frame rates will vary depending on your device, but 120fps (frames per second), which slows real life down by 5x, is plenty most of the time. If you want to get really crazy, 240fps will slow down your scene by 10x. If this is sounding complicated, all you need to remember is that the higher the fps, the slower the slo-mo.
Once your fps is set, jump into your Camera app. On an iPhone, you’ll have to slide to the right to go from “Video” mode to “Slo-Mo.” Only hit record when you’re ready for the big moment so you’re not stuck editing out minutes of worthless footage.
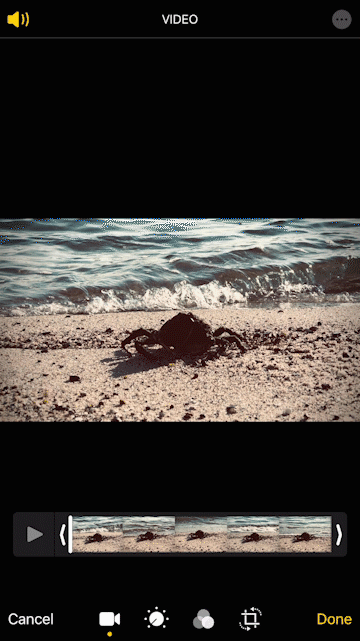
Bam! You got the epic shot. Even though you were careful, there’s still probably some extra time you want to trim off the front and back ends of the clip so you can get that perfect money shot. Press “Edit” and drag the start and end of your clip to your desired in and out points, as below. Decide if you want to modify the length of the original clip (“Save Video”) or click “Save Video as New Clip” to create another copy. Most of the time I’ll just “Save Video” to avoid unnecessary clip confusion and duplication.
#2: Crystal Clear Audio
If you can get these two audio elements right, you’ll be ahead of 95% of the talking heads out there!
If your audience can’t hear you, they won’t watch you.
The biggest thing you can do to help is minimize the distance between your camera and your subject. Audio quality falls off rapidly the further your phone is from the person speaking, so don’t be shy (while maintaining social distance, if necessary)! This is a win-win really, since standing about 6’ feet from your subject is optimal for a good, balanced composition to your image.
If your audience can’t see it, they shouldn’t be able to hear it.
When we say this, we’re talking about distracting off-screen audio intrusions, like computer alerts, your neighbor’s lawn mower, or your upstairs neighbors throwing their kettlebells around. When your audience hears such disturbances, they’ll be momentarily confused and probably lose track of what you were saying. And if this happens repeatedly, they’re liable to click out entirely.
On the other hand, if you’re filming in your garden, birds chirping and light traffic is easily overlooked by your audience, and can even heighten the realism, since the noises match the environment they’re seeing.
The key to avoiding both of these issues is to choose a truly quiet place and time to film. This is, of course, easier said than done, but simply taking stock of your surroundings when you film can help immensely – temporarily turn off the air conditioner, tell the kids to play in the other room, or wait for your next open block to film if the landscapers just showed up next door (ugh, not again!).
If you can’t avoid filming in a noisy environment, consider purchasing an external lavalier microphone, like the Rode smartLav+, that plugs directly into the iPhone with a Lightning to 3.5mm headphone jack adapter. The quality will be noticeably better than the iPhone alone in almost every scenario.
#3: Add Polish with Color Corrections
Who wants footage that looks just like everybody else’s? Give your clips some unique personality by modifying the color — subtly and tastefully of course! Let’s make a quick mention of the powerful, clip-specific color changes you can make in the “Edit” panel of each clip of your Camera .
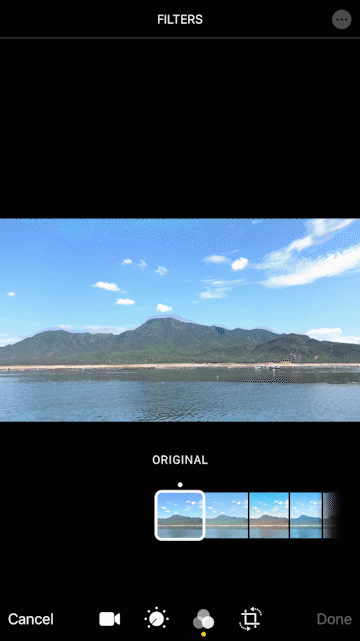
The Filters Panel
If you’re just looking for a quick “look” to apply a la Instagram, you’ll find plenty of filters to swipe through, from warm and cold versions of “Vivid” (which will increase the contrast and saturation) to a few different B&W (black and white) versions. Get a feel for what they look like below:
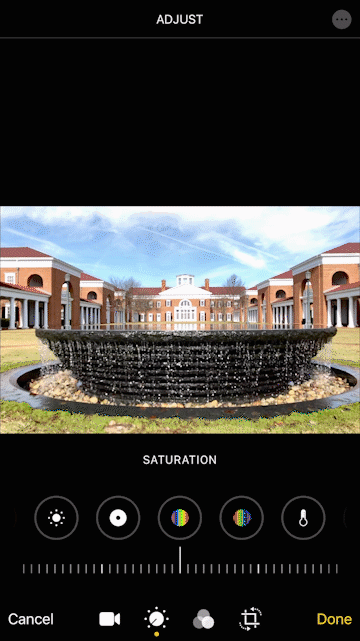
The ADJUST Panel
If you’re ready to really get under the hood, you can make a ton of changes to the clip’s color, exposure and much more in Adjust. (Or, just hit “Auto” to get a pretty reliable improvement). The best way to get a feel for what each parameter does is simply by spinning the dial.
If you’re preparing a number of clips for the montage mentioned below, just remember that you’ll likely want to apply similar effects across all of them for visual consistency. If you ever forget what you’ve done to a clip, you can always dive back into Edit to see your modifications.
#4: Automatic, Magical Video Montages
While much of the time you’ll be uploading single clips to social media, YouTube or your intranet, there are times when creating quick montage with music is just what you’re looking for:
- Event/Conference Recap Videos
- Product/Service Sizzle Videos
- Personal Vacation/Trip Highlight Reels
And good news: There’s an easy built-in way to do that on the iPhone you might not know about. Best of all, it doesn’t require any special editing expertise.
But it does require a few non-intuitive steps, so follow along with the sequence below.
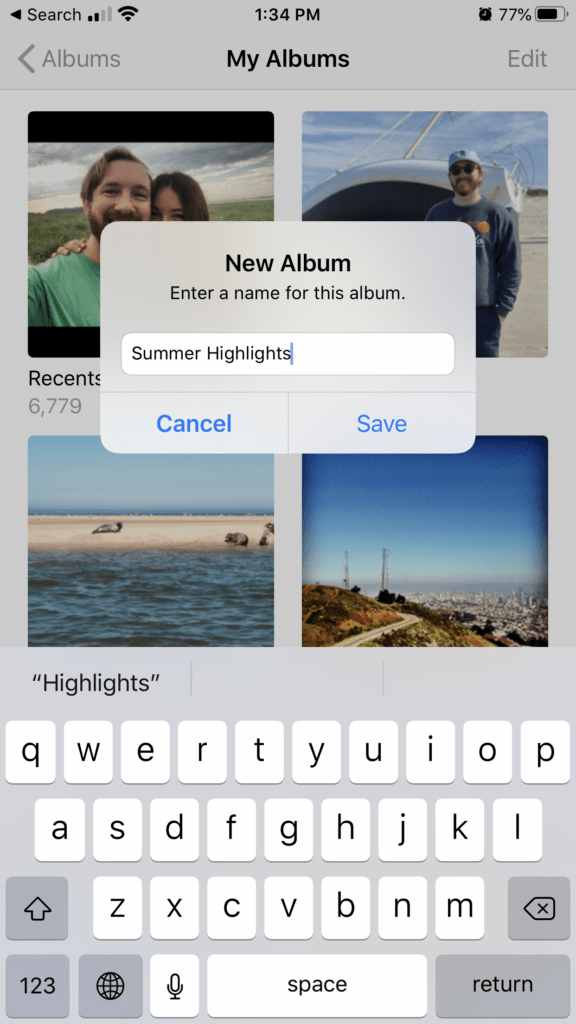
Open the Photos app and go to the albums button on the bottom of the screen. Next, tap the plus symbol in the upper-left hand corner to create and name your new album. Think of this as your “movie folder,” and name it appropriately.
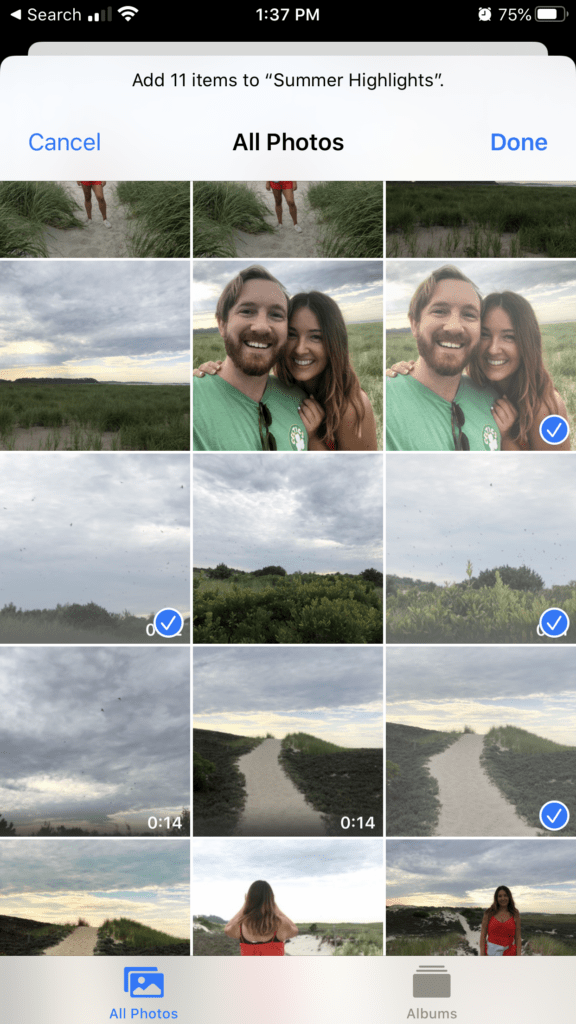
A window with all of your recent photos and videos will pop up. You can select a combination of photos and videos depending on your needs. If you want to narrow your view to your available videos, tap Albums in the bottom right and navigate to Videos under Media Types. Select all of the videos you want to include in this montage (you need to select at least 9 files in my tests for it to work), and press Done in the upper-right.
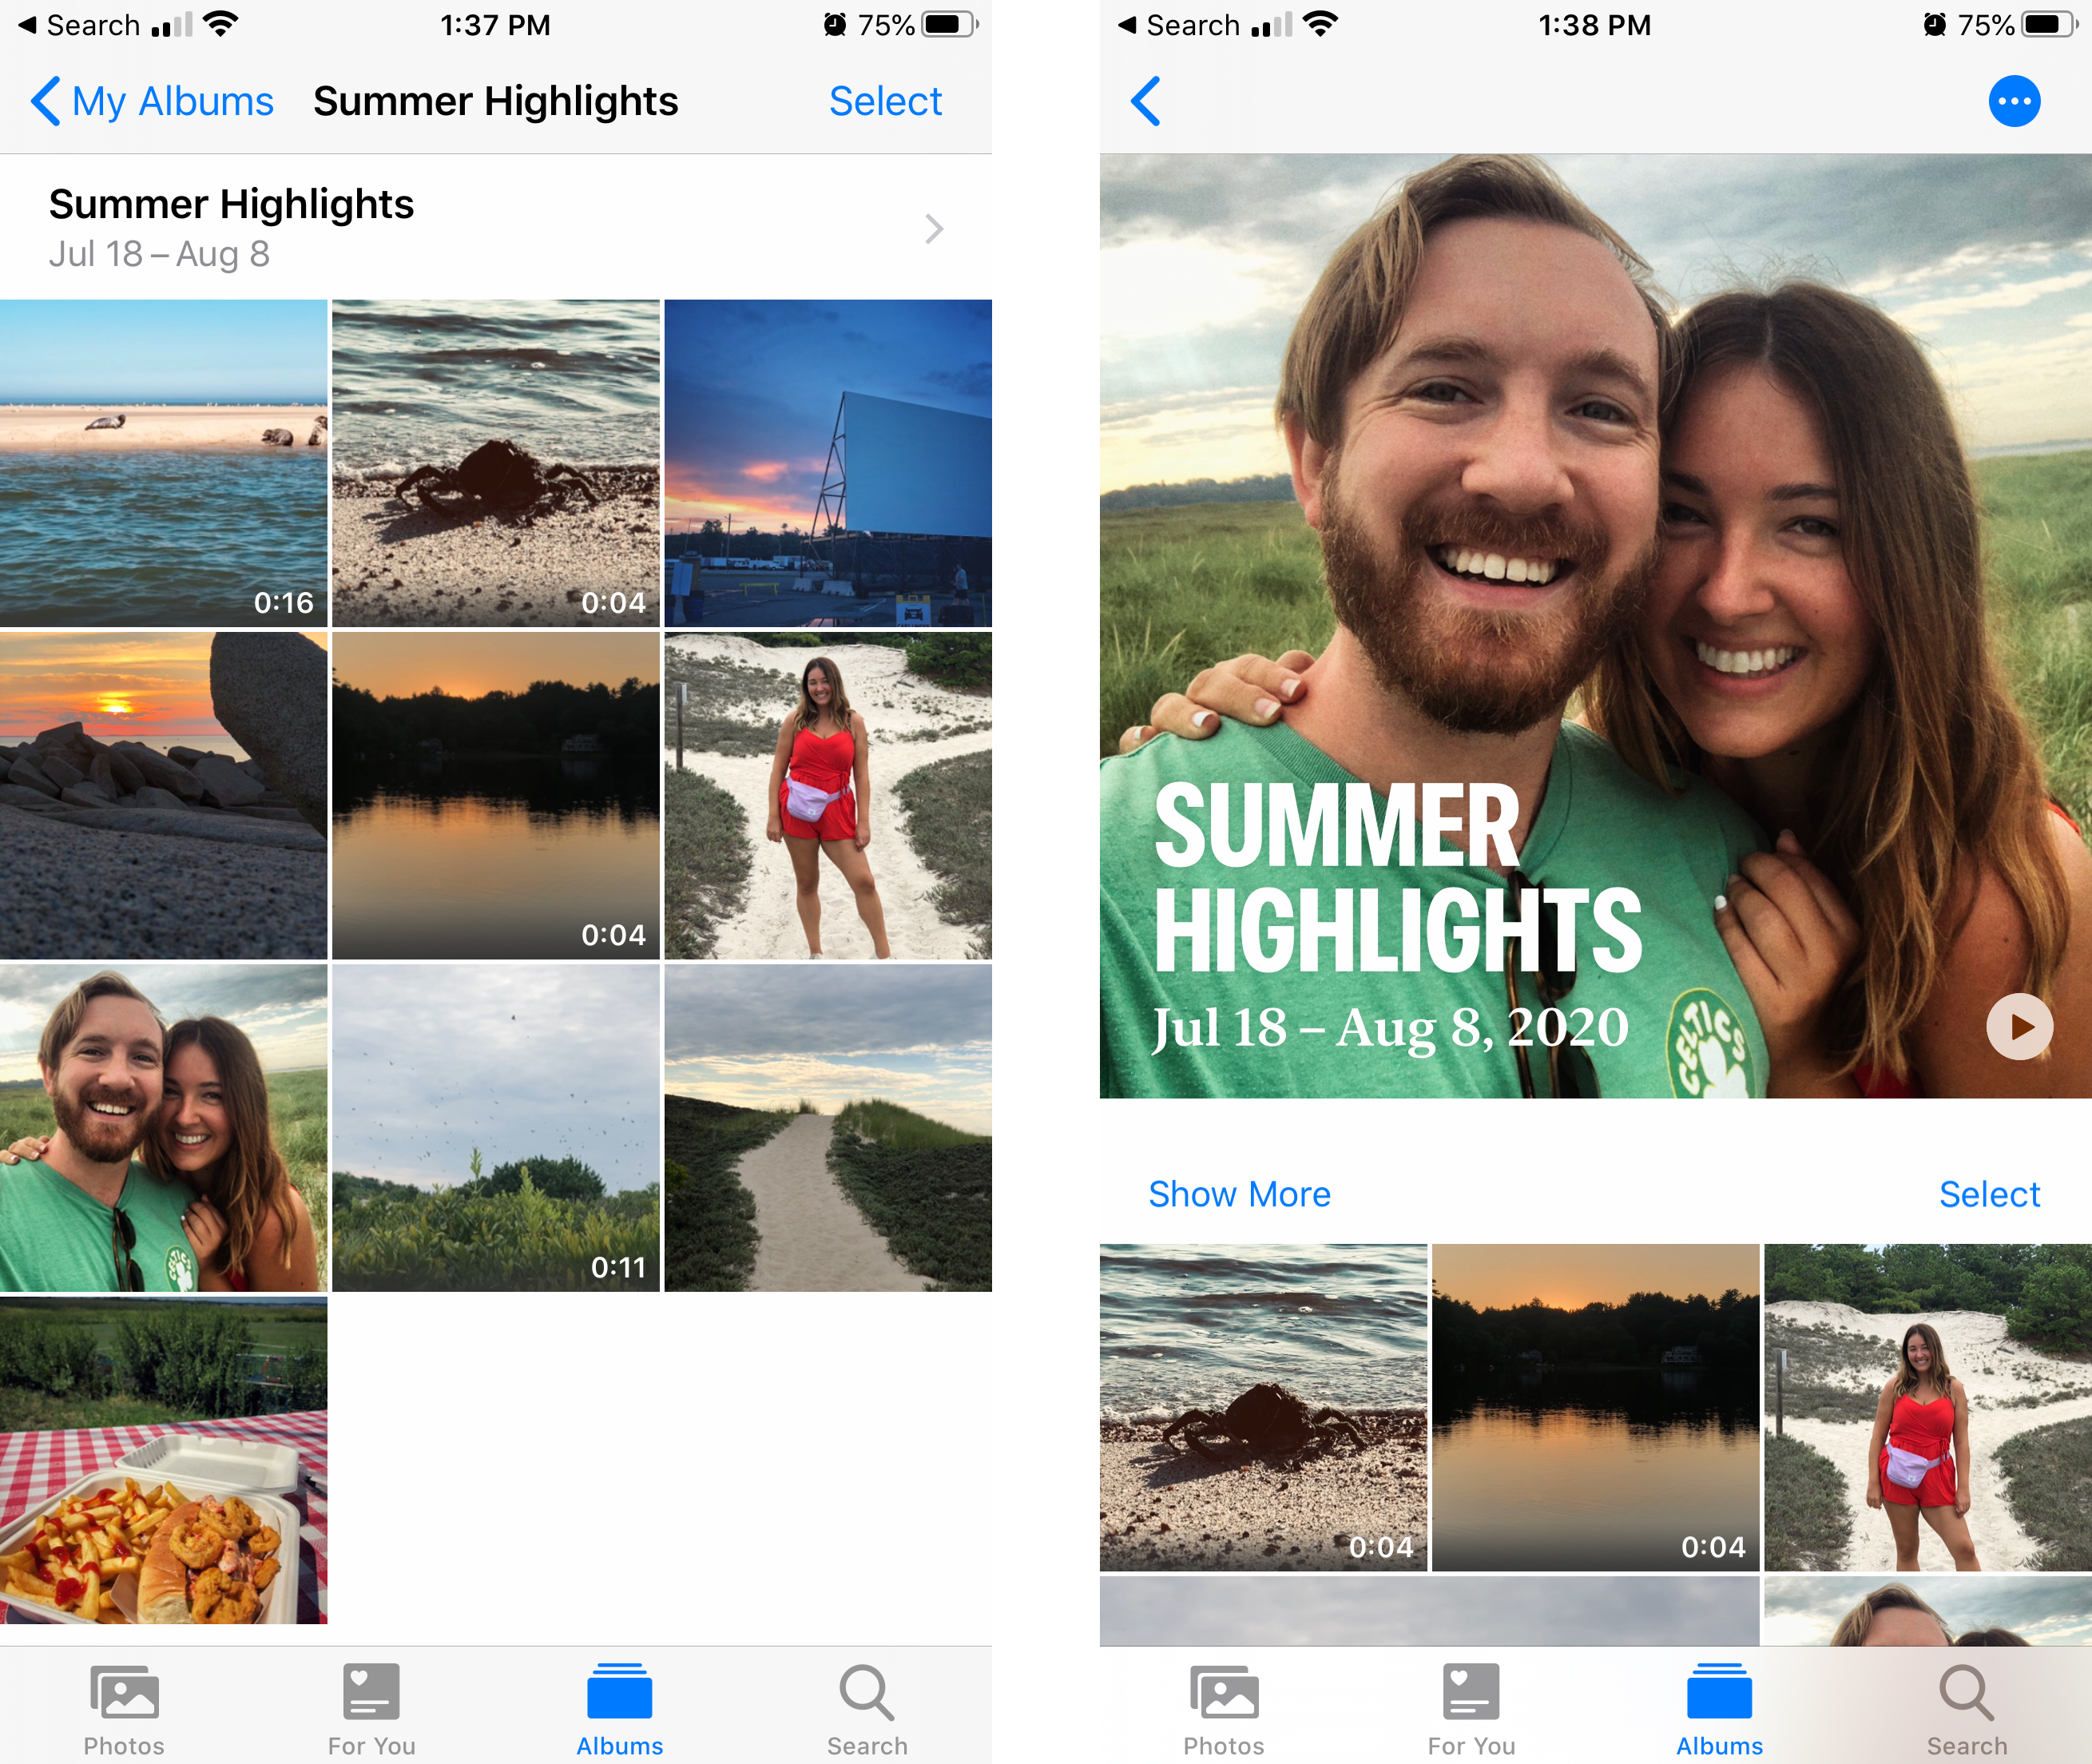
Your new album is now, you guessed it, in your Albums. Tap to open it and double check that every piece of media you want is in it.
Here’s when the movie magic starts to happen. Press the tiny grey arrow or “>” symbol in the upper-right. Now, tap the play icon to preview your automatically created video montage!
Since you’ll probably want to make some adjustments, tap the Edit button in the upper right and “Add to Memories” to bring up some additional settings.
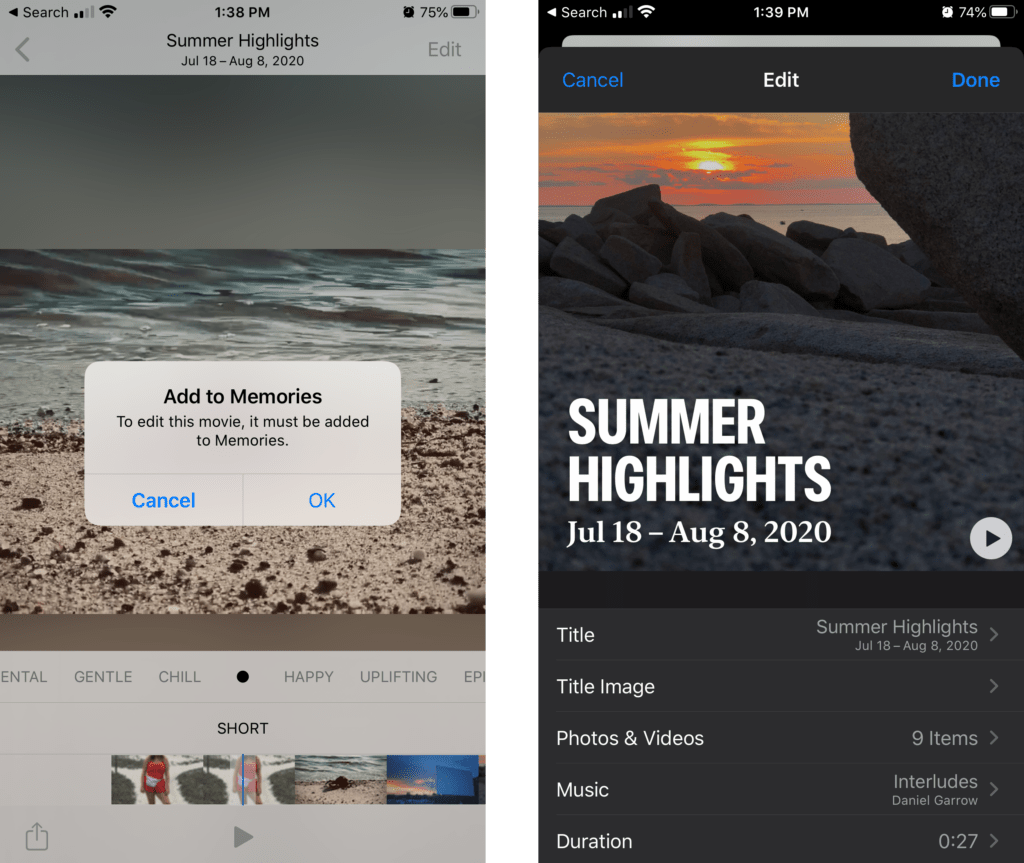
From here, you can customize your soundtrack with royalty-free music, pick a new title image and adjust the montage length. Have fun playing around! All of your edits are non-destructive, meaning you can always go back later if you change your mind.
Once it’s to your liking and ready for the world, click the Share icon in the lower left to post it to your social media accounts, save it to your Drive, send it in an iMessage or do whatever else you need.
We hope these tips aid you in your efforts to produce high-quality, self-shot video content. If you’re looking for some extra hands and expertise, fill out the form below to schedule a free strategy call with our team.