Over the coming days we’ll be sharing new resources that can empower you to continue to create impactful, “at-home” marketing content for your organization during this unusual time. Welcome! Today is Part I, “Tips for Shooting Smartphone Video.”
While professional production value and polish is still critical to most forms of video, the current situation presents a fantastic opportunity for your organization to step it up in the DIY video-shoot department. The great news is that you and your colleagues already have fully capable smartphone cameras in your pockets. Below you’ll find some simple best practices that’ll help you take full advantage of the tech and look the part of a video wizard to your colleagues, customers and prospects alike. If you’re not sure what low-hanging video fruit to prioritize, here are some basic ideas:
- Messages from the C-suite
- Personal sales messages
- Internal trainings and process explainers
- Customer FAQs
- Company-wide announcements and quarterly business reviews
Does your team have content already shot that you need quickly and professionally edited? At Matter, we specialize in post-production video editing and so much more. If you’re looking for some extra hands and expertise, click HERE to schedule a free strategy call with our team.
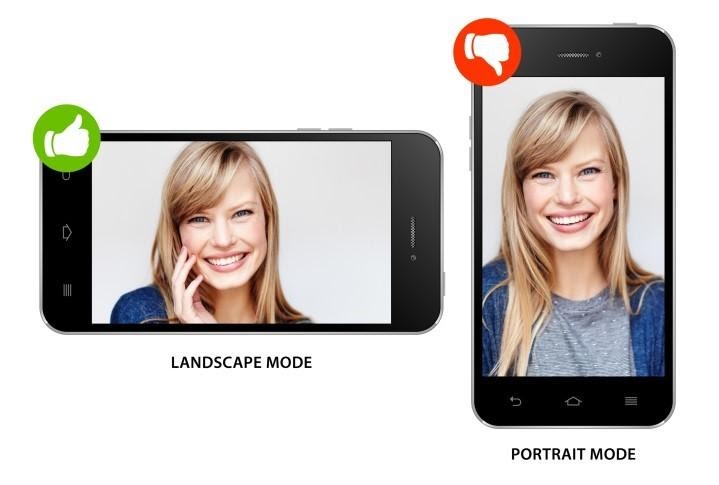
Shoot in Landscape (Horizontal) Mode
Always turn your phone horizontally to film in landscape mode unless you have a specific reason not to (like you’re filming specifically for Instagram). This way, you ensure the correct widescreen aspect ratio common to all video players (like YouTube, Facebook, and LinkedIn) and avoid those lame black bars that appear on either side of a vertically shot video. If you’re filming a person, including yourself, make sure you follow the rule-of-thirds and have your subject’s eyes centered in the top third of the frame like in the example.
Follow the Rule of Thirds
In professional video you’ll notice the subject’s head is almost always placed along the top third-line of the frame. This reliably ensures a balanced feel to the shot. You should center-frame the subject if they’re speaking directly into the camera, but place them in the left or right third if speaking to someone off-camera, as seen below.

Keep Still & Hold Your Shot
The less you move your phone the more professional and smoother your video will look, so be mindful to not distract your viewer with jittery video. We’d suggest purchasing a basic tripod with a smartphone mount to get stable shots that don’t wear your arms out. If you just need something small to put on your desk, a GorillaPod works great.
Mind Your Background and Lighting
Briefly check these aspects of your scene before rolling:
- The background. Try to avoid filming yourself directly up against a wall — it can strike a hostage video vibe pretty quickly! The best backgrounds tend to be ones with lots of space and light, like the open office, or, if you’re working from home, the office or den. For the video to feel personal, you need a background with some personality.
- The light. Can you clearly see the whites of your own eyes, or is it too dark? Consider flipping the light switch or trying another location with more ample natural light. When in doubt, set yourself up facing a window, so the light pours onto your face. And particularly when filming with a webcam ensure there’s a light source in front of your computer so you’re well lit.
- The noise level. While some natural background noise can be okay depending on your use case, take a second to listen if there’s anything that’ll interfere with you being heard — such as heating/ventilation, background music, side conversations or outdoor traffic.

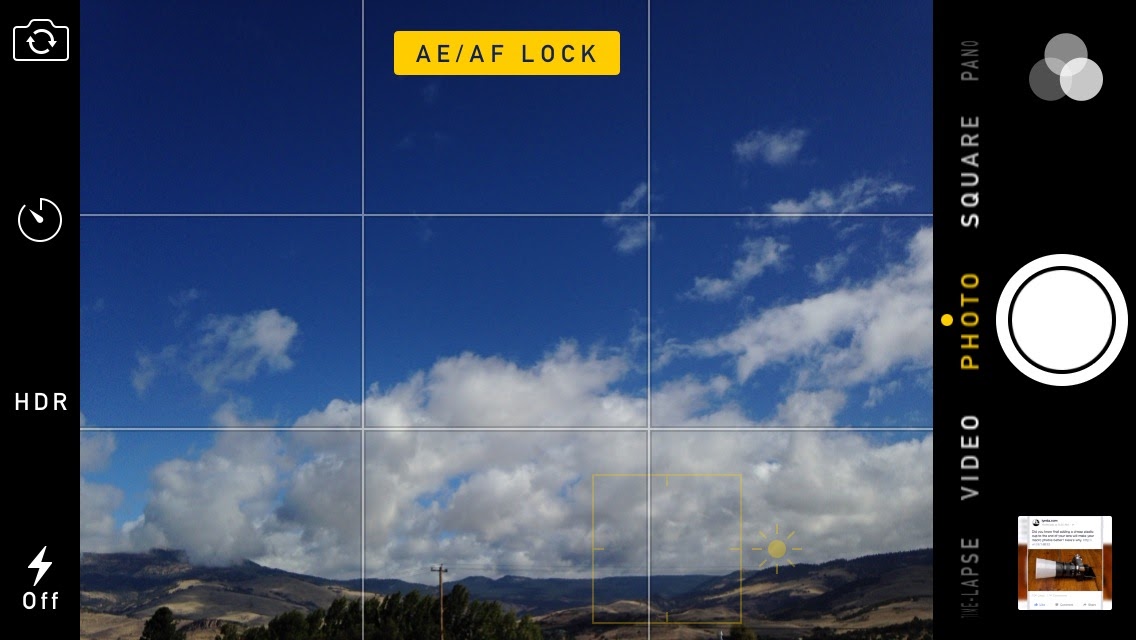
Keep Consistent Exposure (Brightness)
Trying to avoid those unprofessional jumps in the video’s brightness? It’s actually easy to lock your exposure on iPhone. Just tap and hold on your subject to set the focus and exposure until you see the yellow bounding box bounce and the text “AE/AF LOCK” appear. Now your exposure won’t automatically shift as you pan around your scene or a cloud passes by. You can also now manually adjust your scene’s exposure by dragging your finger up (to increase brightness) and down (to darken the image).
We hope these tips aid you in your efforts to produce high-quality self-shot video content. If you’re looking for some extra hands and expertise, fill out the form below to schedule a free strategy call with our team.